
Sync a notebook in OneNote
OneNote automatically synchronizes shared notebooks at regular intervals. But sometimes, you may want to sync a shared notebook to make sure your changes get uploaded right away (for example, if you're getting on a plane and need to shut down your laptop).
-
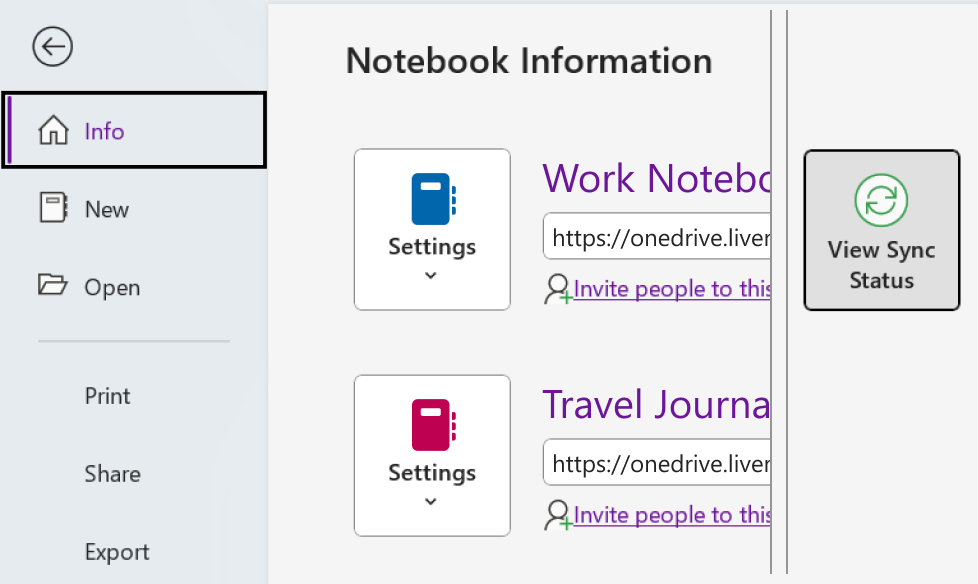
Click File > Info > View Sync Status.
-
In the Shared Notebook Synchronization dialog box that opens, do either of the following:
-
Click Sync All to sync all of your shared notebooks.
-
Click Sync Now next to the specific notebook that you want to sync.
-
OneNote for Windows 10 automatically syncs all of your notes for you. If you prefer, you can choose to sync notebooks manually whenever you want.
Do the following:
-
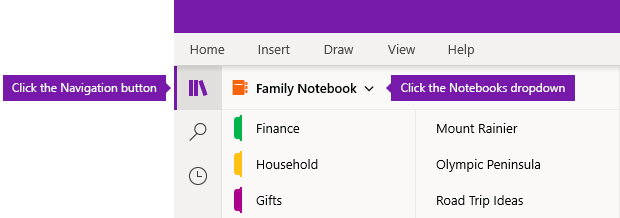
Click the Navigation button near the upper left of the OneNote app window.
-
In the navigation pane that opens, click the Notebooks dropdown arrow next to the name of the current notebook.
-
In the list of notebooks that appears, right-click the name of the notebook you want to sync, point to Sync, and then choose either Sync This Notebook, or Sync All Notebooks.
OneNote for Windows 8 uses cloud-based storage, such as OneDrive and SharePoint, to keep your notebooks accessible from anywhere.
Note: This topic is about the OneNote app you can get from the Windows 8 Store. If you're using OneNote for Windows 10 or OneNote 2016, you can compare them and see the differences here.
OneNote automatically synchronizes your notes whenever you're connected to these services. The steps for sharing and syncing can vary, depending on where you store your notes.
Share your notes with other people
You can quickly share a single page or share an entire notebook with other people.
Share a single page of a notebook
-
Navigate to the page you want to share, and then tap its page tab on the left to select it.
A thick border appears around the page tab when it's selected.
-
Swipe from the right side of the screen to the left, and then tap the Share charm.
-
Select the share target (for example, Mail).
-
Follow the necessary steps in the target application (for example, enter the recipient’s email address and a title for your message), and tap Share/Send.
Note: The contents of your page will be shared in the body of your message. Recipients will not receive a link to the page in your notebook, or be able to edit the page in your notebook unless they already have permissions to do so.
Share an entire notebook on OneDrive
-
Go to the OneDrive home page and sign in, if prompted.
-
Tap the check box next to the folder that contains the notebook you want to share.
-
Near the right side of the screen, tap Share. (Make sure you don't accidentally share the entire Documents folder on OneDrive.)
-
In the form that appears, tap Get a link.
-
If you want recipients to only view your notes, under View Only, tap Create. If you want recipients to view and change your notes, under the View and Edit heading, tap Create.
-
When the link appears highlighted, copy it, and then paste it into an email message to let others know where they can access your notes.
Note: The following steps won’t work with notes stored on OneDrive.
Share an entire notebook on SharePoint
-
Swipe upward from the bottom of the screen and tap Notebooks.
-
Select the notebook you want to share, swipe upward from the bottom of the screen again, and tap Copy Link to Notebook.
-
Switch to your favorite mail app, and then paste the copied link and a brief description into the message body.
-
Add a subject and recipients, and then send the message. Recipients of your message will be able to access your notebook if they have permissions to your SharePoint site.
Sync notebooks automatically or manually
OneNote automatically keeps your cloud-based notes in sync at all times, but after a service interruption (for example, during a long flight), you may prefer to manually sync your notes.
-
Open any page in the notebook that you want to sync, and then swipe upward from the bottom of the screen.
-
Tap Notebooks, and then select the notebook you want to sync.
-
In the app bar at the bottom of the screen, tap Sync.
In the list of Notebooks, a small sync icon to the left of a notebook’s name indicates its sync status. Here’s what the icons mean:
-
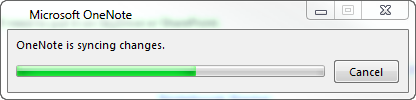
Green circular arrows: Notebook synchronization is in progress. You can edit your notes during this process.
-
A red circle with an X: One or more synchronization errors have occurred in your notebook. Tap the red sync icon to view specifics and to troubleshoot the issue. For more information, see Troubleshoot errors in OneNote.
-
A yellow triangle with an exclamation mark: Your connection to the server is lost and you’re currently working offline. Once your connection is restored, OneNote will automatically sync your changes again.
Manage sync settings
Use the Setting screen to view and manage your OneNote accounts.
-
On any page, swipe from the right side of the screen to the left.
-
Tap Settings > Options.
-
Under Sync your notebooks, choose whether or not OneNote should automatically sync your notes. If you set this option to No, make sure you manually sync whenever you’ve made important changes to your notes.
Work with misplaced sections
Misplaced sections can appear when OneNote attempts to sync changes to a notebook section, but can't find the section file. When that happens, a Misplaced Sections icon appears in your Notebook list. Misplaced sections remain in a notebook until OneNote discovers the new location of the section, or until the misplaced section is moved or deleted.
If a section in a shared notebook can't be synchronized, but you want to keep the information it contains, move the unsynchronized section to another notebook.
Move a misplaced section to another notebook
-
Tap to select the tab of the misplaced section that you want to move.
-
Drag the section into the notebook you want.
If you intentionally delete a section and you no longer need to synchronize or save your changes, you can delete the misplaced section.
Delete a misplaced section from your notebook
-
Tap to select the tab of the section, and then tap Delete Section on the app bar.
-
Acknowledge the warning message, and then tap Delete Section.
Note: Deleting a section is permanent. If you aren’t sure you want to do that, move the section to another part of your notebook instead.
OneNote for Mac keeps all of your notes in the cloud by automatically syncing them to your OneDrive account automatically. This lets you view and edit your notes anywhere on all of your devices.
While you cannot turn off automatic syncing of notebooks, there may be times when you want to sync manually, to force syncing a large amount of changes to notes before having to disconnect on short notice (for example, when stepping on an airplane).
Do the following:
-
To see your list of notebooks, if the Navigation button is off (


-
Click the Notebooks list dropdown arrow that appears above the section and page lists. You may need to click the name of the current notebook to see the list of notebooks.
-
Hold the Control key while clicking the name of the notebook you want to manually sync.
-
On the menu that appears, click Sync This Notebook.
You can use Microsoft OneNote on your iPad or iPhone to keep in sync with any notebooks that you’ve created with OneNote 2016 on your Mac or PC, even if you use different cloud-based accounts for these two versions of OneNote.
Open Mac or PC notebooks (same OneDrive account)
Because OneNote 2016 for Mac or PC requires notebooks to be saved to a cloud-based OneDrive account, the notebooks you’ve created and used with that account are already accessible on your iPad or iPhone, provided you’ve logged in with the same OneDrive account as the one you’re using on your Mac or PC.
To open additional notebooks on the same OneDrive account, do the following:
-
In Microsoft OneNote on your iPad or iPhone, tap More Notebooks at the bottom of your notebooks list.
-
Tap any additional notebook(s) that you want to open, and then navigate to its sections or pages.
Note: You can use the preceding step to open any notebooks on your iPad or iPhone that were created with OneNote for Windows. However, notebooks originally created in versions earlier than OneNote 2010 for Windows will not sync with OneNote on your iPad or iPhone. To sync such notebooks across your devices, you must first upgrade your Windows PC to OneNote 2016, update your notebooks to the newer notebook format, and then move your local notebooks to OneDrive.
Open Mac or PC notebooks (different OneDrive accounts)
If you’re currently using a different OneDrive account on your iPad or iPhone than the one you use on your Mac or PC, you can sign into your Mac or PC notebooks by doing the following:
Step 1: Add your Mac or PC's OneDrive account to your iPad or iPhone
-
In Microsoft OneNote, go to Settings on your device:
-
On an iPad, tap the gear icon in the upper right corner.
-
On an iPhone, tap the ellipsis ( ... ) icon and then tap Settings.
-
-
Under Account, tap the currently selected account. (If you’re currently signed out of all accounts, tap Sign In.)
-
Under Connected Services, tap + Add a Service.
-
Under Connect a Cloud Service, tap OneDrive.
-
Enter the email address of the OneDrive account that you use for the OneNote notebooks on your Mac or PC, and then tap Next.
-
On the next screen, enter the password of the OneDrive account that you use for the OneNote notebooks on your Mac or PC, and then tap Sign in.
Now that you’ve authenticated your access to the OneDrive account that you use on your Mac or PC, you can open the notebooks on it.
Step 2: Open notebooks from your Mac or PC on your iPad or iPhone
-
In Microsoft OneNote on your iPad or iPhone, tap More Notebooks at the bottom of your notebooks list.
-
Tap any additional notebook(s) that you want to open, and then navigate to its sections or pages.
Note: You can use the preceding step to open any notebooks on your iPad or iPhone that were created with OneNote for Windows. However, notebooks originally created in versions earlier than OneNote 2010 for Windows will not sync with OneNote on your iPad or iPhone. To sync such notebooks across your devices, you must first upgrade your Windows PC to OneNote 2016, update your notebooks to the newer notebook format, and then move your local notebooks to OneDrive.
If you use Microsoft OneNote on an iPad or iPhone with very large notebooks that were originally created on a PC or Mac, opening and syncing such notebooks on your iPhone or iPad for the very first time can cause some performance and stability issues.
If you are experiencing such issues while connecting to large notebooks, turn off the automatic syncing of note attachments by following the steps outlined below, and then try syncing your large notebooks again.
Note: This documentation applies to Microsoft OneNote for iPhone and iPad. It is recommended that you keep your devices updated with the newest version of Apple iOS. For more information, see Update the iOS software on your iPhone, iPad, or iPod touch.
To turn off automatic syncing of note attachments in OneNote on your iPhone or iPad, do the following:
-
Open the OneNote notebook.
-
In the upper-right, tap the ... (ellipsis) button.
-
Next, tap the Settings icon.
-
Tap Sync.
-
Set the Auto Sync Attachments option to off.
How do I sync my notes with OneDrive
Syncing happens automatically when you move between notes and sections. For example, if you type a new note and then tap backwards to the sections view, the new note syncs with OneDrive.
Do the following to manually sync your notes.
-
On your Android phone, open OneNote, and then on the bottom left, tap Notebooks.
-
Tap the More options button

-
Tap Sync all.
If you use Samsung Notes on your mobile device, you can easily bring your mobile notes to your PC by integrating them with the OneNote feed.
The OneNote feed conveniently combines your notes from different apps — including Samsung Notes, Sticky Notes, and OneNote. It is currently available in Outlook on the web and Outlook.com.
Do the following:
-
On your mobile device, open the Samsung Notes app.
-
On the welcome prompt about syncing with Microsoft apps, tap Continue.
Alternatively, you can go to the Samsung Notes app settings and select Sync with Microsoft OneNote.
-
On the next screen, tap Sign in to continue.
-
Sign in with the same Microsoft account (or work or school account) where you want to use your OneNote feed and then grant the necessary permissions when prompted.
-
Select the folder or folders that you want to sync.
Folders in Samsung Notes can be selected individually to sync with Microsoft apps. The sync relationship of a selected folder is indicated in Settings, with a small OneNote icon displayed after the folder name.
-
On your PC, make sure you’re signed into Outlook on the web or Outlook.com with the same account that you synced your notes in Step 4.
-
In Outlook on the web or Outlook.com, tap the OneNote feed icon near the upper right corner.
When the task pane opens, your synced notes from Samsung Notes, Sticky Notes, and OneNote will appear in your feed.
Note: To use any of the notes that you’ve selected to sync between Samsung Notes and the OneNote feed, select any note in your feed, click the Copy button to copy its contents, and then paste it where you want. For more information, see Use the OneNote feed in Outlook on the web.
-
Where can I find the OneNote feed?
The OneNote feed is currently available in OneNote for the web, OneNote for Windows 10, Outlook.com, and Outlook on the web.
-
What types of notes can sync to the OneNote feed?
You can currently sync notes from OneNote, Sticky Notes, and Samsung Notes to the OneNote feed.
-
Can I create, edit or delete Samsung notes from the OneNote feed?
No, individual Samsung notes can’t be created, edited in, or deleted from the OneNote feed.
-
Can I create, edit or delete a OneNote page in the OneNote feed?
No, individual OneNote pages can’t be created, edited in or deleted from the OneNote feed.
-
How can I stop syncing my Samsung Notes into OneNote feed?
To stop syncing your Samsung notes with the OneNote feed, remove your Microsoft account from the Samsung Notes app settings.
-
How can I export my Samsung Notes?
You can export your notes if you have signed into Samsung Notes and then synced your account to OneNote. Samsung Notes synced to OneNote are stored in Outlook.com, along with your mail, calendar, and contacts, and they can be exported along with other Outlook.com items. For more information, see Export mailbox and delete search history in Outlook.com.
When everything is set up properly, syncing is automatic. Here's how to make sure your Android phone is syncing your OneNote notes.
First, make sure your notebook is on OneDrive. If you're using OneNote for Windows 10, your notebooks are automatically stored on OneDrive.
If you're using OneNote 2010, 2013, or 2016 on your Windows computer, here's how to move your notebooks to OneDrive.
-
Open the notebook on your computer and click File > Share.
-
Select a location for your notebook, or click Add a Place, and then sign into OneDrive.
Note: If you don’t already have a OneDrive account, you can sign up for free at onedrive.com.
-
After the location you want appears in the list, click to select it.
-
Enter a name for your notebook (if you like, you can pick the same name it already has), and then click Move Notebook.
OneNote moves the notebook from your computer to OneDrive.
-
Sign in to OneNote on your phone with your OneDrive account and open the notebook.
You can use a web browser to get to your OneDrive account. After you sign in, your notes will sync automatically.
-
From your computer, open onedrive.com and sign in with your Microsoft account.
-
Find the notebook you want and click to open it either in OneNote or in OneNote for the web.
Syncing happens automatically when you move between notes and sections. For example, if you type a new note and then tap backwards to the sections view, the new note syncs with OneDrive.
Do the following to manually sync your notes.
-
On your Android phone, open OneNote, and then on the bottom left, tap Notebooks.
-
Tap the More options button
-
Tap Sync all.
Sync notes using only Wi-Fi networks
If you prefer not to use your data plan to sync notes, you can choose to sync notes on your Android phone only when a Wi-Fi network is available.
-
On your Android phone, open OneNote, and then on the bottom left, tap Notebooks.
-
Tap the More options button
-
Open OneNote and then on the bottom-left tap Notebooks.
-
Tap Add your work or school account for more notebooks.
-
Enter your organization’s account information.
After you sign in, your work or school notebooks with any will show under WORK OR EDUCATION NOTEBOOKS.
In OneNote for the web, there’s typically no need to manually save or sync your notes while you work. OneNote continually syncs your changes in the background, leaving you free to concentrate on your thoughts and ideas.
If you’re working on time-sensitive projects in shared notebooks that are simultaneously co-authored by multiple people, you may want to manually sync any large page changes that you’ve made so that others can see them immediately. While this is not currently possible in OneNote for the web, you can use the OneNote desktop app on your Windows PC or on your Mac to manually sync notes when needed. For more information, see either of the following:
This article details best practices for moving and syncing OneNote notebooks, as well as issues that may arise if notebooks are moved or synced in ways that are not recommended. In general, OneNote notebooks should always be synced and moved by the OneNote application, and not by file based synchronization systems such as a client application (such as the OneDrive or DropBox local client) or offline folders. Reasons for moving and syncing notebooks via OneNote include:
-
Web Apps and Mobile Sync - The built-in sharing functionality correctly sets up the notebook on the server so that OneNote Web App will be able to open it. Also, the mobile versions of OneNote (iOS, Android) can only open notebooks that are shared through this mechanism.
-
Offline edits - OneNote creates a local copy of the notebook for offline editing in the Local Settings folder, and merges the changes to the cloud when a connection is re-established. Unlike other file synchronization methods however, OneNote is able to merge the changes without creating conflicts within the notebook.
-
Efficient syncing - OneNote has built-in sync logic with OneDrive allowing it to synchronize only the changes, which is significantly more efficient than file synchronization mechanisms like the OneDrive Desktop app or DropBox as it knows about the file format and can sync only the changes.
If you have a notebook stored locally on your computer that you wish to move to the cloud, go to File > Share in OneNote and pick a web location such as OneDrive, and then click Move Notebook.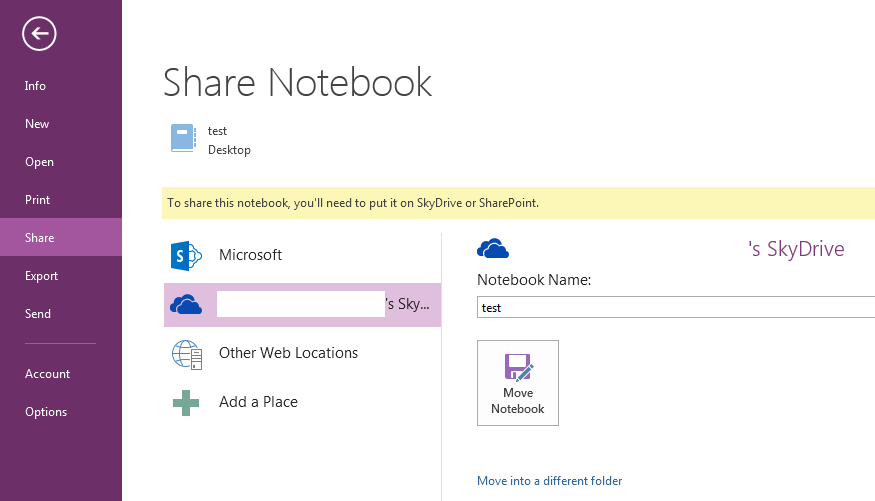


More information
Placing OneNote notebooks on Windows Offline File shares is also not recommended. Windows Offline Files introduces a file cache separate from the cache that OneNote already uses for offline editing. In this scenario, OneNote may sync changes to the Windows cache while the Windows file is offline, in effect syncing to a local copy instead of the server copy. When the Windows share is back online, the user may be prompted to keep two copies of the file or replace one copy. Choosing to keep two copies of the file will result in duplicate sections within OneNote, while opting to replace a copy of the notebook could result in data loss. Microsoft recommends that users of Windows Offline Files place their OneNote notebooks in a separate location that is not synchronized by Windows Offline Files. Users with notebooks currently in an Offline Files share should move their notebooks to a new location.
Turn off automatic notebook synchronization
-
To sync manually, click File >View Sync Status.
-
In the Shared Notebook Synchronization dialog box, click Sync manually.
Important: When you work offline, OneNote no longer attempts to synchronize any notebook changes that you make on your computer, even if you exit and restart OneNote at a later time. No one else can see your changes to the notebooks until you turn the automatic notebook synchronization feature back on.
Turn automatic notebook synchronization back on
-
To restore automatic sync, click File >View Sync Status.
-
In the Shared Notebook Synchronization dialog box, click Sync automatically whenever there are changes, and then click Sync All.
-
Click Close when synchronization is finished.


Need more help?
Want more options?
Explore subscription benefits, browse training courses, learn how to secure your device, and more.


Communities help you ask and answer questions, give feedback, and hear from experts with rich knowledge.


