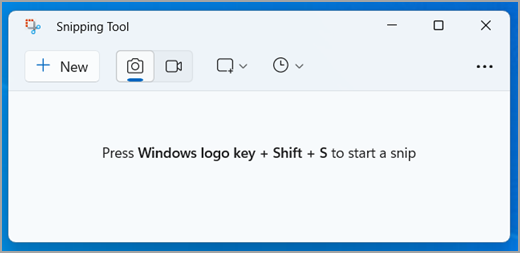
Take a snapshot to copy words or images from all or part of your PC screen. Use Snipping Tool to make changes or notes, then save, and share.
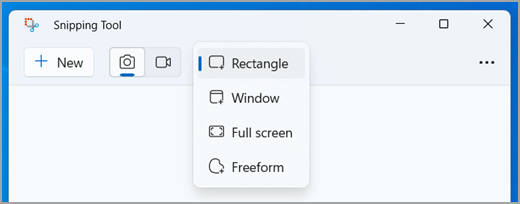
Capture any of the following types of snips:
|
Free-form snip |
Draw a free-form shape around an object. |
|
Rectangular snip |
Drag the cursor around an object to form a rectangle. |
|
Window snip |
Select a window, such as a dialog box, that you want to capture. |
|
Full-screen snip |
Capture the entire screen. |
|
Video snip |
Capture a video clip of a rectangular selection of any part of the screen you like. |
When you capture a snip, it's automatically copied to the Snipping Tool window where you make changes, save, and share.
Open Snipping Tool
There are four ways to open Snipping Tool:
-
Select the Start button, enter snipping tool, then select Snipping Tool from the results.
-
Press Windows logo key + Shift + S for a static image snip.
-
Press Print Screen (PrtSc) for a static image snip.
-
Press Windows logo key + Shift + R for a video snip.
Work with your screenshots
With Snipping Tool open, select one of the following to create and work with your screenshots.
In Snipping Tool, select Mode. In earlier versions of Windows, select the arrow next to the New button. Next, when you choose the kind of snip you want, you’ll see the whole screen change slightly to gray. Then, choosing from anything currently displayed on the screen, select the area of your screen that you want to capture.

-
After you open Snipping Tool, open the menu that you want to capture.
-
Press Ctrl +PrtSc keys. The entire screen changes to gray including the open menu.
-
Select Mode, or in earlier versions of Windows, select the arrow next to the New button. Select the kind of snip you want, and then select the area of the screen capture that you want to capture.
After you capture a image snip, you can write or draw on or around it by selecting the Pen or Highlighter buttons. Select Eraser to remove the lines you've drawn.

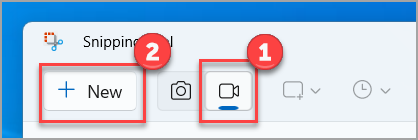
To capture a video snip, open Snipping Tool, select the Record button, then select New recording, or press Windows logo key + Shift + R. Select the area of the screen you wish to record, then select Start. When you are done, select Stop. At this point you can save the recording as-is or select Edit in Clipchamp to work with it in the Clipchamp video editor.
-
After you capture a snip, select the Save Snip button.
-
In the Save As box, type a file name, location, and type, and then select Save.
When you capture a snip from a browser window and save it as an HTML file, the URL appears below the snip. To prevent the URL from appearing:
-
In the Snipping Tool, select the Options button.
-
In the Snipping Tools Options box, clear the Include URL below snips (HTML only) check box, then select OK.
After you capture a snip, select the arrow next to the Send Snip button, and then select an option from the list.
Once you've captured a snip, select the Text Actions button to activate the Optical Character Recognition (OCR) feature. This allows you to extract text directly from your image. From here, you have the option to either select and copy specific text, or use the tools to Copy all text or to Quick redact. All text recognition processes are performed locally on your device.
|
Press these keys |
To do this |
|---|---|
|
Alt + M |
Choose a snipping mode. |
|
Alt + N |
Create a new snip in the same mode as the last one. |
|
Shift + arrow keys |
Move the cursor to select from different types of snips. |
|
Alt + D |
Delay capture by 1-5 seconds |
|
Ctrl + C |
Copy the snip to clipboard |
|
Ctrl + S |
Save the snip |
With your capture open in Snipping Tool, select Edit > Edit with Paint to use features for sizing, color, text, and many other enhancements.
In the folder where you’ve saved your snip, right click on the snip. Select Print from the options and make choices for how you want to print your image.
In the search box on the taskbar, type snipping tool. You’ll see the Snipping Tool app and a list of actions you can take. Select Pin to taskbar.
First, identify the menu or other components you want to capture. In Snipping Tool, select Delay and then select, for example, 5 seconds. Select Mode to start the 5-second countdown. Within 5 seconds, open a menu or otherwise compose your image. At 5 seconds, when you see the screen turn gray, use the mouse to draw around the area you want.
Take a snapshot to copy words or images from all or part of your PC screen. Use Snipping Tool to make changes or notes, then save, and share.
Capture any of the following types of snips:
|
Free-form snip |
Draw a free-form shape around an object. |
|
Rectangular snip |
Drag the cursor around an object to form a rectangle. |
|
Window snip |
Select a window, such as a dialog box, that you want to capture. |
|
Full-screen snip |
Capture the entire screen. |
When you capture a snip, it's automatically copied to the Snipping Tool window where you make changes, save, and share.
Open Snipping Tool
There are three ways to open Snipping Tool:
-
Select the Start button, enter snipping tool, then select Snipping Tool from the results.
-
Press Windows logo key + Shift + S.
-
Press Print Screen (PrtSc).
Work with your screenshots
With Snipping Tool open, select one of the following to create and work with your screenshots.
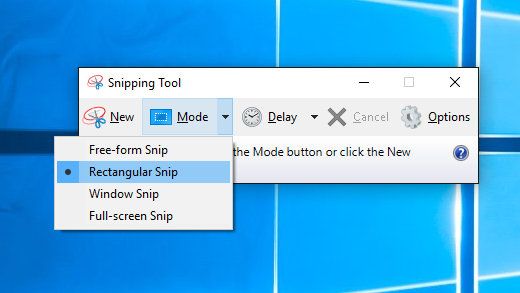
In Snipping Tool, select Mode. In earlier versions of Windows, select the arrow next to the New button. Next, when you choose the kind of snip you want, you’ll see the whole screen change slightly to gray. Then, choosing from anything currently displayed on the screen, select the area of your screen that you want to capture.

-
After you open Snipping Tool, open the menu that you want to capture.
-
Press Ctrl + PrtSc keys. The entire screen changes to gray including the open menu.
-
Select Mode, or in earlier versions of Windows, select the arrow next to the New button. Select the kind of snip you want, and then select the area of the screen capture that you want to capture.
After you capture a snip, you can write or draw on or around it by selecting the Pen or Highlighter buttons. Select Eraser to remove the lines you've drawn.
-
After you capture a snip, select the Save Snip button.
-
In the Save As box, type a file name, location, and type, and then select Save.
When you capture a snip from a browser window and save it as an HTML file, the URL appears below the snip. To prevent the URL from appearing:
-
In the Snipping Tool, select the Options button.
-
In the Snipping Tools Options box, clear the Include URL below snips (HTML only) check box, then select OK.
After you capture a snip, select the arrow next to the Send Snip button, and then select an option from the list.
|
Press these keys |
To do this |
|---|---|
|
Alt + M |
Choose a snipping mode. |
|
Alt + N |
Create a new snip in the same mode as the last one. |
|
Shift + arrow keys |
Move the cursor to select from different types of snips. |
|
Alt + D |
Delay capture by 1-5 seconds |
|
Ctrl + C |
Copy the snip to clipboard |
|
Ctrl + S |
Save the snip |
With your capture open in Snipping Tool, select Edit > Edit with Paint 3D to use features for sizing, color, text, and many other enhancements.
In the folder where you’ve saved your snip, right click on the snip. Select Print from the options and make choices for how you want to print your image.
In the search box on the taskbar, type snipping tool. You’ll see the Snipping Tool app and a list of actions you can take. Select Pin to taskbar.
First, identify the menu or other components you want to capture. In Snipping Tool, select Delay and then select, for example, 5 seconds. Select Mode to start the 5-second countdown. Within 5 seconds, open a menu or otherwise compose your image. At 5 seconds, when you see the screen turn gray, use the mouse to draw around the area you want.


