
Use Microsoft Teams live events for tier 1 events
Important:
-
Teams live events will be retired and replaced by town halls in September 2024.Get started with town hall in Teams for enhanced virtual event experiences.
-
To learn more, see Switch from Microsoft Teams live events to town halls.
Tier 1 events, also known as high-profile events or town halls, typically broadcast content to a large audience, often with high production values such as multiple video and audio sources, and a dedicated event team.
Microsoft Teams is an effective tool for these events, when combined with appropriate planning, rehearsal, and possibly additional hardware or software.
If you’ve used Skype Meeting Broadcast
You may have run tier 1 events in the past with Skype Meeting Broadcast. If this is the case, it might be useful to consider what has changed with live events in Teams.
Running a live event in Teams is similar to Skype Meeting Broadcast, but with some new capabilities:
-
Screen share
-
Direct encoder connector
-
Broadcast to Teams, Yammer, and Microsoft Stream
-
Set up and produce directly from the Teams app
It’s not possible to add a poll or measure audience sentiment in live events yet. A similar feature is coming soon.
For a detailed introduction to live events in Microsoft 365, read Live events across Microsoft 365 in Yammer, Microsoft Teams, and Microsoft Stream (preview).
Live streaming basics
Before we dive into the recommended practices, let’s review the main components involved in live streaming, and how they relate to live events in Teams.
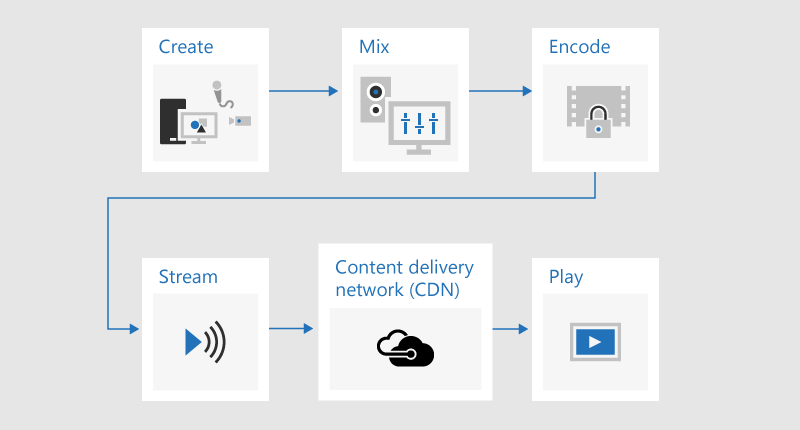
You start with content you want to share with your audience. This is probably a combination of:
-
Live video
-
Pre-recorded video
-
Screen share
-
Remote presenters
Depending on what (if any) additional hardware you are using, Teams might be used to provide mixing and encoding capabilities; or just control your broadcast which is produced using an external app or device.
Then, your event will be streamed by Microsoft Stream, using Azure Media Services as the backbone.
Next, your content will go through a content delivery network (CDN), Azure in this case, which can integrate with third-party optimization to reduce bandwidth to large sites.
Finally, your content will be watched by attendees on Teams.
Producing in Teams versus an external app or device
You can use Teams to produce and mix content. From a producer’s perspective, live events produced in Teams look and operate in a similar way to a standard video meeting – except the producer chooses which video and content source is used as the live feed. Quick start events can allow attendees to be anonymous, or require them to be authenticated.
Live events produced using an external app or device take a single pre-mixed input from a hardware or software encoder. It’s not possible to mix additional content sources with an external encoder event, but it does allow producers the ability to use all the mixing capabilities in their existing system. The encoder sends the content directly to Teams via an RTMP ingest, a widely supported industry standard. Events produced outside of Teams are brought into Teams using Microsoft Steam, which means the attendees must be authenticated and cannot be anonymous.
For more information on the capabilities of both event types, check out Schedule a Teams live event.
A hybrid approach is to create an event produced in Teams and include the input from an external encoder as one of the video sources. Events produced in Teams cannot use the RTMP ingestion method, so this needs to be achieved through an HDMI capture device. This offers additional flexibility, as it means the producer can use a professional mixing desk for the main content feed, but still use Teams to add remote presenters joining from a standard web cam, for example. It also means the events can be anonymous. This was how Microsoft Future Decoded Live was produced in 2018.
Use studio-grade cameras with a hardware capture device or encoder
While it’s possible to use one or more web cams for tier 1 events – just like you would for a standard video call or meeting – many producers prefer to use a professional camera or input from a mixing desk.
A live event can use any video source which appears as a Teams capable web cam in Windows, and any Windows sound source.
-
You can use studio-grade cameras, or a mixing desk, which output content as HDMI or SDI if the content is ingested using a capture card or dongle. Hardware expansion cards are available from several manufacturers to be fitted into the desktop PC used for broadcasting. Or, there are several hardware dongles that can accept an HDMI or SDI input and convert into a USB connection, which appears in Windows as a standard USB web cam. You can select this capture source in the meeting settings. If your device can be used in a standard Teams video call, it can be used in a Teams live event.
-
If your HDMI or SDI stream is sending audio along with video, select the same web cam driver as the microphone source in the meeting settings.
-
You can use several hardware capture devices, one on each computer used for broadcasting, and change between camera shots by selecting the active video for broadcast in Teams (Figure 1).
-
Alternatively, if your event is produced by a production company or specialized in-house department, they might already have an HDMI feed from a mixing desk or other equipment, which has shots from several cameras and audio sources mixed together. In this case, a single source into Teams will be sufficient - either ingested into an event produced in Teams via a capture card or dongle; or directly via RTMP in an event produced using an external app or device (Figure 2).
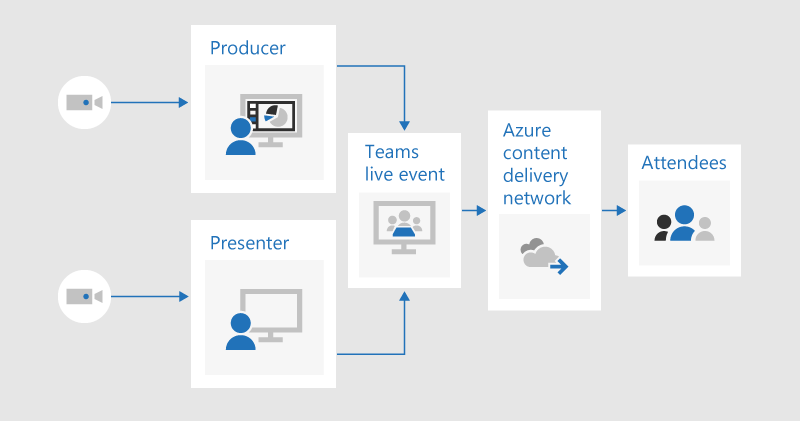
Figure 1 – Producing a live event using Teams
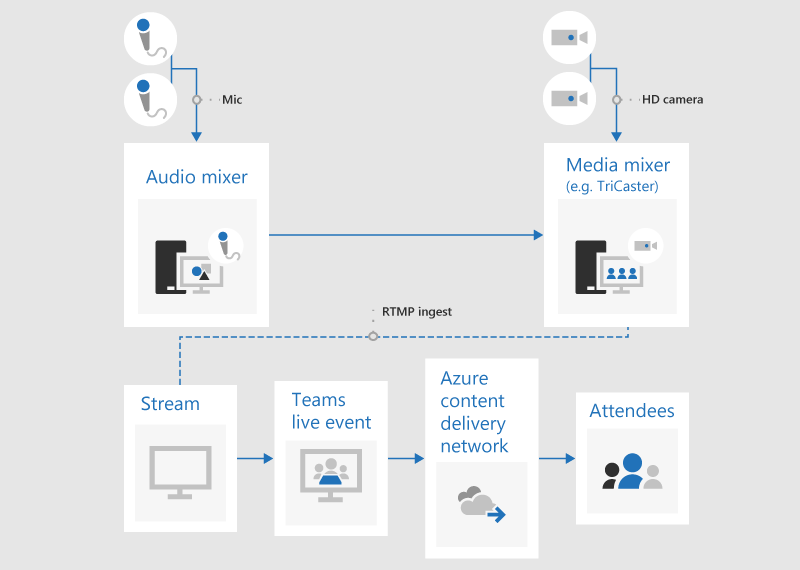
Figure 2 – Producing a live event using external broadcasting devices
Add screen share and pre-recorded video
While it is possible to switch the active video source inside Teams during a live event, with multiple sources of video and audio you might find it easier to use a vision mixing desk, and ingest a single, pre-mixed feed into the event. This also has the advantage of requiring fewer capture devices and presentation PCs.
Adding on-screen graphics, sometimes known as lower thirds, can give your audience valuable information about the person speaking, and is often a hallmark of high-quality productions.
Many entry-level mixing desks support alpha-key (otherwise known as chroma-key) to overlap one image on top of another by suppressing a specific color. This can be useful to add captions and graphics.
One approach is to add your captions and graphics to a PowerPoint deck with a blue or green background (as required by the vision mixer) and then use the vision mixer’s alpha-key effect to overlay these graphics onto the camera source. You can use PowerPoint to animate your graphics on and off the screen.
Manage remote rooms and auditoria
Keep in mind that attendees will be watching the event with a delay of around 20 to 30 seconds. This won’t be an issue for people watching individually on their own devices, but it has implications if you are streaming the broadcast to an auditorium which includes remote presenters.
Rooms containing both attendees and remote presenters will need to receive the real-time meeting feed via Teams, and not watch the time-delayed broadcast as an attendee. Therefore, you should join the rooms containing remote presenters as presenters in Teams.
If possible, add the remote room as a presenter and not a producer. This simplifies the Teams app and makes it easier to maximize the broadcast content for display on a large screen. If you hide the Windows taskbar, you can maximize the content so it nearly fills the screen – with the exception of the Teams title bar – which cannot be removed. Be aware that presenters in a will see all video sources - like a regular Teams meeting - and not just the selected video or content being broadcast. Therefore you should rehearse the remote room setup with the number of presenters and sources you expect to use during the event to ensure you understand the view these presenters will see.
Present in a Live Event in Teams outlines the differences between producers and presenters and will help you plan which is the appropriate role to assign to each member of your event team.
Rehearse sound in the remote auditorium carefully, particularly checking for any undesirable echo. If possible, use the same Teams app to play audio into the room and record audio from the room. This will allow Teams to use the default noise-cancelling effectively, and produce a "clean mix" of the room’s audio.
Make your broadcast resilient to networking or hardware failures
Check the best practices guidance concerning having multiple devices and multiple members of the event team who can continue to control the broadcast if a device or network fails. These additional steps can be useful:
-
If you're using a video capture device, consider using an HDMI or SDI splitter to duplicate the output, then ingest the video separately using two capture devices into two machines. This provides resilience at multiple points.
-
Consider using different networks on your backup devices, for example a high-speed cellular connection in addition to your corporate wired or wireless network.
-
Consider using the real-time monitoring features available from Hive Insights during the broadcast to check numbers of attendees and levels of streaming quality.
-
Remember that even if some attendees fail to successfully watch the broadcast live due to networking issues in their location, it is being recorded and can be watched back on demand when in a location with better connectivity.
Final thoughts
Unlike Skype Meeting Broadcast – and in contrast to a typical Teams meeting – it’s not currently possible to add additional presenters to a broadcast once the broadcast has started. So, make sure all presenters are added before starting the broadcast. Remember to include remote presenters and backup machines if you’re using them.
It’s tempting to start the broadcast ahead of time to be confident it has started correctly. This is the advice we typically give, including in Best Practices for Producing a Teams Live Event. But there’s no way to “trim” a broadcast, so people who watch the recording will have to watch or skip through any dead air time. This is at odds with the feel of a high-quality tier 1 event, which usually starts and ends precisely on time. Assuming other guidance has been followed – around adequate preparation, rehearsal, and making your broadcast resilient to failure – you should feel confident in starting the broadcast on time, and not early.
Need assistance with your events ?
With the Microsoft 365 Live Event Assistance Program (LEAP), we can help you get more familiar with setting up and running an event, webinar, or large meeting and be available during the event to help if any questions or issues come up.
During preview, the assistance program is free to customers using Teams, Stream, or Yammer to deliver their events. Sign up now to get started.


Need more help?
Want more options?
Explore subscription benefits, browse training courses, learn how to secure your device, and more.


Communities help you ask and answer questions, give feedback, and hear from experts with rich knowledge.


