
Schedule a meeting with registration in Microsoft Teams
Instead of sending out meeting invitations that contain a Join meeting link, you can publicize your meeting and have attendees register. You’ll cast a wider net for attendees, and it will allow your attendees to provide important info about their interests.
In this article
About meetings with registration
Customize the registration form
Add presenters after sending the invite
About meetings with registration
In meetings with registration, the organizer and presenters have more control than in a regular meeting. By default, attendees:
-
Wait in the lobby until the organizer or a presenter lets them into the meeting.
-
Cannot share content.
If the meeting is open to the public, attendees are muted and their video is turned off when they join.
Presenters may use polls during the meeting to engage the audience and gather info.
Note: Currently channel meetings and recurring meetings don’t support attendee registration.
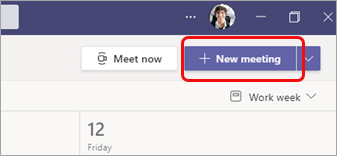
Schedule the meeting
-
Go to your Teams Calendar.
-
Select New meeting.
-
In the meeting Details, select Require registration.
-
From the dropdown menu, select For people in your org or For everyone (for a meeting open to the public).
Notes:
-
If you don’t see the Require registration option, contact your IT admin.
-
If you want to schedule a public meeting but don’t see For everyone in the dropdown menu, contact your IT admin.
-
-
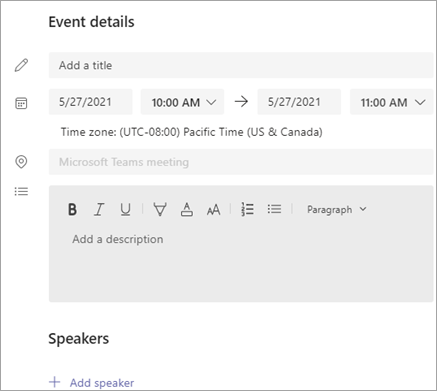
In the meeting Details, enter a title for the meeting, date, start and end times, and a description.
The info that you enter on this page is for the meeting presenters only—attendees won’t see it. If you want, you can set a different start time for meeting attendees so that you’ll have time to prepare with the presenters before the attendees join. (See Customize the registration form for instructions.)Note: We suggest that you set the meeting policy to have attendees wait in the lobby so that you or a presenter can let them into the meeting when you're ready. For instructions, see Change participant settings for a Teams meeting.
Add presenters (optional)
To allow people besides yourself to present content during the meeting, list them on the invite. Presenters don’t need to register for the meeting.
Note: If you add presenters after sending out the meeting invite, you’ll need to perform additional steps; see Add presenters after sending the invite.
-
In the Add required presenters field, enter their names.
-
If there are optional presenters, select Optional presenters and enter their names.
An anonymous presenter will join the meeting as an attendee. You'll need to make them a presenter for them to be able to share content:
-
Select Show participants in your meeting controls to see a list of all the people in the meeting.
-
Hover over the name of the person whose role you want to change and select More options

Customize the registration form
Potential meeting attendees get this form when they select the meeting registration link. They fill it out and submit it to receive the join link for the meeting.
-
In the meeting Details, select View registration form.

Add a custom image (optional)
You can add a banner or other image to the top of the attendee registration form.
-
Select Add an image at the top of the page.
-
Select Upload an image, locate and select the image you want to use, and select Done.
-
Select Done again.
To remove the image, select the X in the upper-right corner of the page.
Enter basic meeting details for attendees
-
Enter the meeting title, date, start and end times, and description. You can also list the speakers, along with their bios.
The info that you enter on this page is for the meeting attendees. If you want, you can set a different start time for meeting presenters so that you’ll have time to prepare with the presenters before the attendees join.
To have attendees wait in the lobby before being admitted to the meeting, see Change participant settings for a Teams meeting.
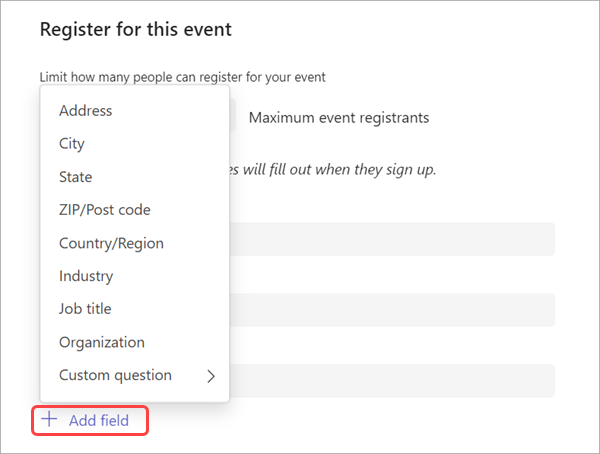
Choose additional fields
The form that attendees will complete includes three required fields: First name, Last name, and Email. You decide the rest.
-
Under Register for this event, select Add field to view a list of commonly requested fields.
-
Select a field from the dropdown menu.
-
When the field appears on the form, select the Required box if you want to require attendees to provide that info. They won’t be able to register for your meeting if they leave the line blank.
-
Repeat steps 1-3 as needed. To delete a field, select X to its right.
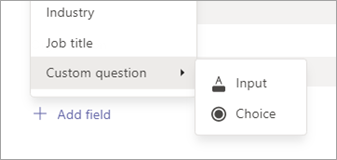
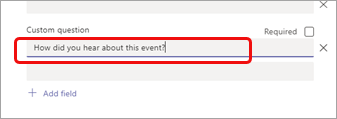
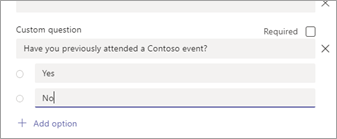
Create custom fields
You can request any amount of additional info, perhaps related to your meeting’s marketing goals or to help plan your training session.
-
Select Add field > Custom question and indicate whether the attendee will be entering info in the questionnaire (select Input) or choosing from options you supply (select Choice).
-
If you chose Input, enter your question in the field under Custom question.
-
If you chose Choice, enter your question under Custom question, select Add option until you have the number of choices you want to provide, and then enter the choices.
-
To preview your registration form, select View in browser at the top right of the page.
-
When you’re done, select Save.
-
To close the form, select the X in the upper-right corner.
Note: The registration form is created as a web form on the organizer's Mysite on SharePoint. Registrants will enter their registration data through a TLS-encrypted connection between their browser and the SharePoint service. When a registrant submits a registration, SharePoint stores the data, encrypted, directly to your organization's SharePoint data storage location as a list on the organizer's Mysite.
Organizers can respond to requests from registrants to exercise data subject rights by directly accessing their registration lists in SharePoint. Admins can use the DSR guidance provided at Office 365 Data Subject Requests for the GDPR and CCPA.
Send the invite
After you’ve completed the basic info for both presenters and attendees, added any additional presenters, and customized the registration form, send out the invite.
Important: You need to do this even if you’re the only presenter.
-
Select Send in the upper-right corner of the page.
The presenters will receive the invite.
The registration link will become active so that prospective attendees can register.
Publicize the meeting
Build excitement and gather an audience for your meeting by sharing the details and registration link with potential attendees. You may want to publicize the event through social media, websites, email, chats, and so on. (The link becomes active after you send out the meeting invite.)
Copy the registration link
-
Double-click the meeting event in your calendar.
-
Select Copy registration link near the top of the page.
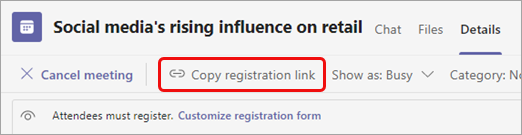
Note: You can also copy the link from the registration form.
Now you can paste the link into your announcements and messages.
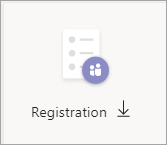
View the registration report
After sending the meeting invite and publicizing your meeting, track who registered and what they entered on the registration form.
-
In your calendar, double-click the meeting.
-
Select Registration to download the report.
Add presenters after sending the invite
When you add presenters to the meeting after you’ve sent the invite, you must give them permission to present. You can do this by changing a meeting option before the meeting or by changing their role during the meeting.
Note: To add an external (guest) presenter, follow the second procedure.
To add a presenter before the meeting:
-
Double-click the event in your calendar.
-
Add the new presenter to the Presenters or Optional presenters line in the invite.
-
Select Send update in the upper-right corner of the screen.
-
Double-click the event in your calendar.
-
Select Change options.

-
Select Roles.
-
In the Choose presenters field, enter the name of the additional presenter.
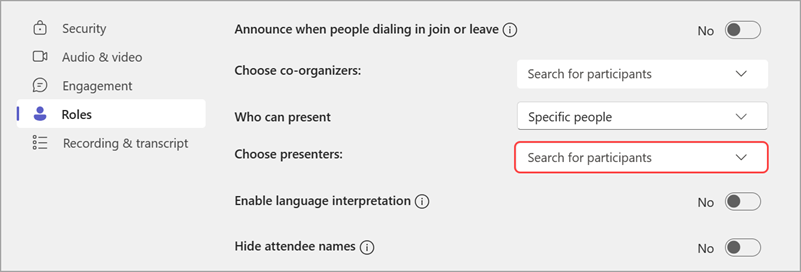
-
Select Save at the bottom of the page.
To let meeting attendees know about the new presenter, see Edit meeting details and inform participants—To inform registered attendees.
To change someone's role during the meeting:
-
Send the meeting join info to the person that will be presenting. The info is available towards the bottom of the meeting event in the calendar, under Microsoft Teams meeting.
-
At meeting time, let the presenter into the meeting.
-
Select People

-
Point to the name of the person whose role you want to change and select More options
Edit meeting details and inform participants
To inform presenters:
Changes to any of the basic meeting info (title, presenters, date, and time) will be emailed to the presenters.
-
In your calendar, double-click the meeting event.
-
Make your changes.
-
Select Send update in the top right of the page.
To inform registered attendees:
Changes to the date and time will be emailed to the registered attendees.
-
In your calendar, double-click the meeting event.
-
Select Customize registration form.
-
Select Edit in the upper-left corner of the form.
-
Make your changes.
-
Select Save in the upper-left corner of the form.
Important: In the Send update? box, select Send.
Cancel the meeting
A cancellation email will be sent to the presenters and registered attendees.
-
In your calendar, double-click the meeting event.
-
Select Cancel meeting.
-
Add an optional cancellation message and select Cancel meeting.
Note: Attendees can cancel their registration from the email that contains their Join link.
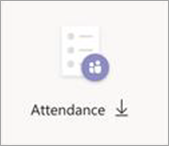
View the post-meeting attendance report
After the meeting, download the attendance report to see who joined the meeting and for how long. You can compare this with the registration report to get a fuller picture of the meeting’s success.
-
In your calendar, double-click the meeting event.
-
Select the Attendance button to download the report.


Need more help?
Want more options?
Explore subscription benefits, browse training courses, learn how to secure your device, and more.


Communities help you ask and answer questions, give feedback, and hear from experts with rich knowledge.


