
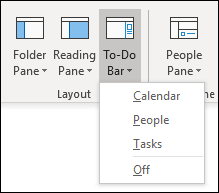
The To-Do Bar is one of the panes you can add to classic Outlook for Windows. You can use the To-Do Bar to display your upcoming calendar events, your task list, or your favorite contacts.
Note: The To-Do Bar is available in classic Outlook. In new Outlook, and Microsoft 365, tasks are displayed with My Day and managed with the To Do app. For more information, check out Create tasks with To Do in Outlook.
Find out which version of Outlook you're using by checking if there's a File tab on the ribbon. If you have a File tab, you're using classic Outlook. If File doesn't appear, you're using new Outlook.
Turn the To-Do Bar on or off
-
To display the To-Do Bar, select View > To-Do Bar.
-
Select Calendar, Tasks, or People. You can pick one type of item to display in the To-Do Bar, two types of items, or all three.
-
To turn the To-Do Bar off, select View > To-Do Bar > Off.
Customize the To-Do Bar
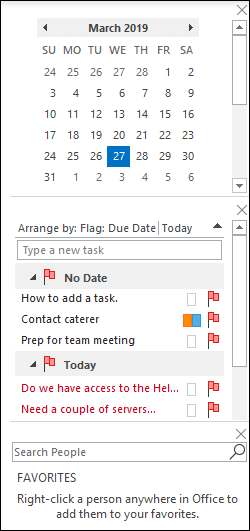
Sections in the To-Do Bar appear in the order you added them. So, if you added the Calendar section, then the Tasks section, then the People section, they will appear in that order. If you want to change the order, you'll need to close the different sections and re-add them in the order in which you want them to appear.
For example, if you added the Tasks view, then the People view, then the Calendar view and you want to display the Calendar on top of the To-Do Bar instead of the bottom, use the following steps.
-
Select View > To-Do Bar > Tasks to hide the Tasks view.
-
Select View > To-Do Bar > People to hide the People view.
-
You should now have only the Calendar view showing.
-
Select View > To-Do Bar > People to place the People view directly under the Calendar view. or select View > To-Do Bar > Tasks to place the Tasks view directly under the Calendar view.
Customize the sort order of Tasks in the To-Do Bar
If you want to customize the sort order of task items in the To-Do Bar, use the following steps.
-
At the top of the To-Do Bar's tasks area, select Arrange by: Flag: Due Date, then select Arrange By to change how tasks are organized.

-
To sort tasks in the opposite order, select the up or down arrow on the right side of the To-Do Bar to reverse the sort order.
Change which contacts appear in the People section of the To-Do Bar
All contacts you've added to Favorites appear in the People section of the To-Do Bar.
-
To add a contact to Favorites, right-click the person's name either from an email message or from your Contacts folder and select Add to Favorites. That person will now appear in the People section of the To-Do Bar, if you've enabled that section.
-
To remove a contact from Favorites, right-click the person's name in the To-Do Bar and select Remove from Favorites. That person is still in your Contacts, but won't appear in the To-Do Bar.
Note: You cannot customize the calendar section of the To-Do Bar.
Keep upcoming tasks always in view
When you point to the Tasks icon on the navigation bar, the Tasks peek shows your upcoming tasks and flagged to-do items. To keep both in view, pin the Tasks peek to the Outlook window.
-
Select Open in a new window .
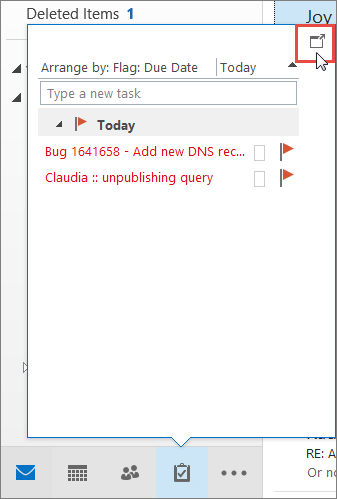
To close the peek, at the top of the pinned Tasks peek, select 
When a peek is pinned or unpinned it only affects that view. For example, if you’re in Mail and pin the Tasks peek, when you switch to Calendar, the Tasks peek doesn’t appear. You can pin or unpin the Tasks peek in each view by clicking 
Show completed tasks in the Tasks view
To review items that you have marked complete, you can change the view settings. This view is useful for reviewing all completed items, or to reactivate a completed task and set a new due date.
-
In Tasks, on the View tab, in the Current View group, select Change View and then select Completed.
To view all items — completed or not — select Simple List or Detailed List.
Note: To view only items that are not complete, use one of the following views: Active, Next 7 Days, and Overdue.
Show completed tasks in the To-Do Bar
-
In the To-Do Bar, right-click in the Type a new task box, and then select Filter.
-
On the Advanced tab, if any of the following entries appear, select the entry, and then select Remove:
-
Date Completed does not exist
-
Click Flag Completed Date does not exist
-
Hide completed tasks in the To-Do Bar
-
In the To-Do Bar, right-click in the Type a new task box, and then select Filter.
-
On the Advanced tab, select Field, point to Date/Time fields, and then select Date Completed.
-
In the Conditions list, select does not exist.
-
Select Add to List.
-
Select Field, point to All Mail fields, and then select Flag Completed Date.
-
In the Conditions list, select does not exist.
-
Select Add to List.
-
Select OK.
See also
Create and view tasks with To-Do Bar in classic Outlook
Manage tasks in classic Outlook
Assign and track tasks in classic Outlook


